An IcloneU account doesn't have to be a solo operation — you can bring in colleagues to help answer messages, edit Clones or manage the account. This quickstart covers the fast path: where the Team page lives, the Invite member action, and choosing a predefined role at invite time. For changing roles later, building custom permission sets and removing people, see the fuller Managing team members and roles.
You need to be the team's Owner or have a role with the Manage team members and roles permission, as every administrator does — the Team page sums it up: "Owners and administrators can add, remove, and change member roles." You'll also need the teammate's email address and a rough idea of what they should be allowed to do.
Where the Team page lives
Everything for people and roles lives on one page, reached from your account menu.
Open the avatar menu
Click your avatar in the top-right corner of the app. The menu drops down with entries for your account, Team, your plan and signing out.
Choose Team
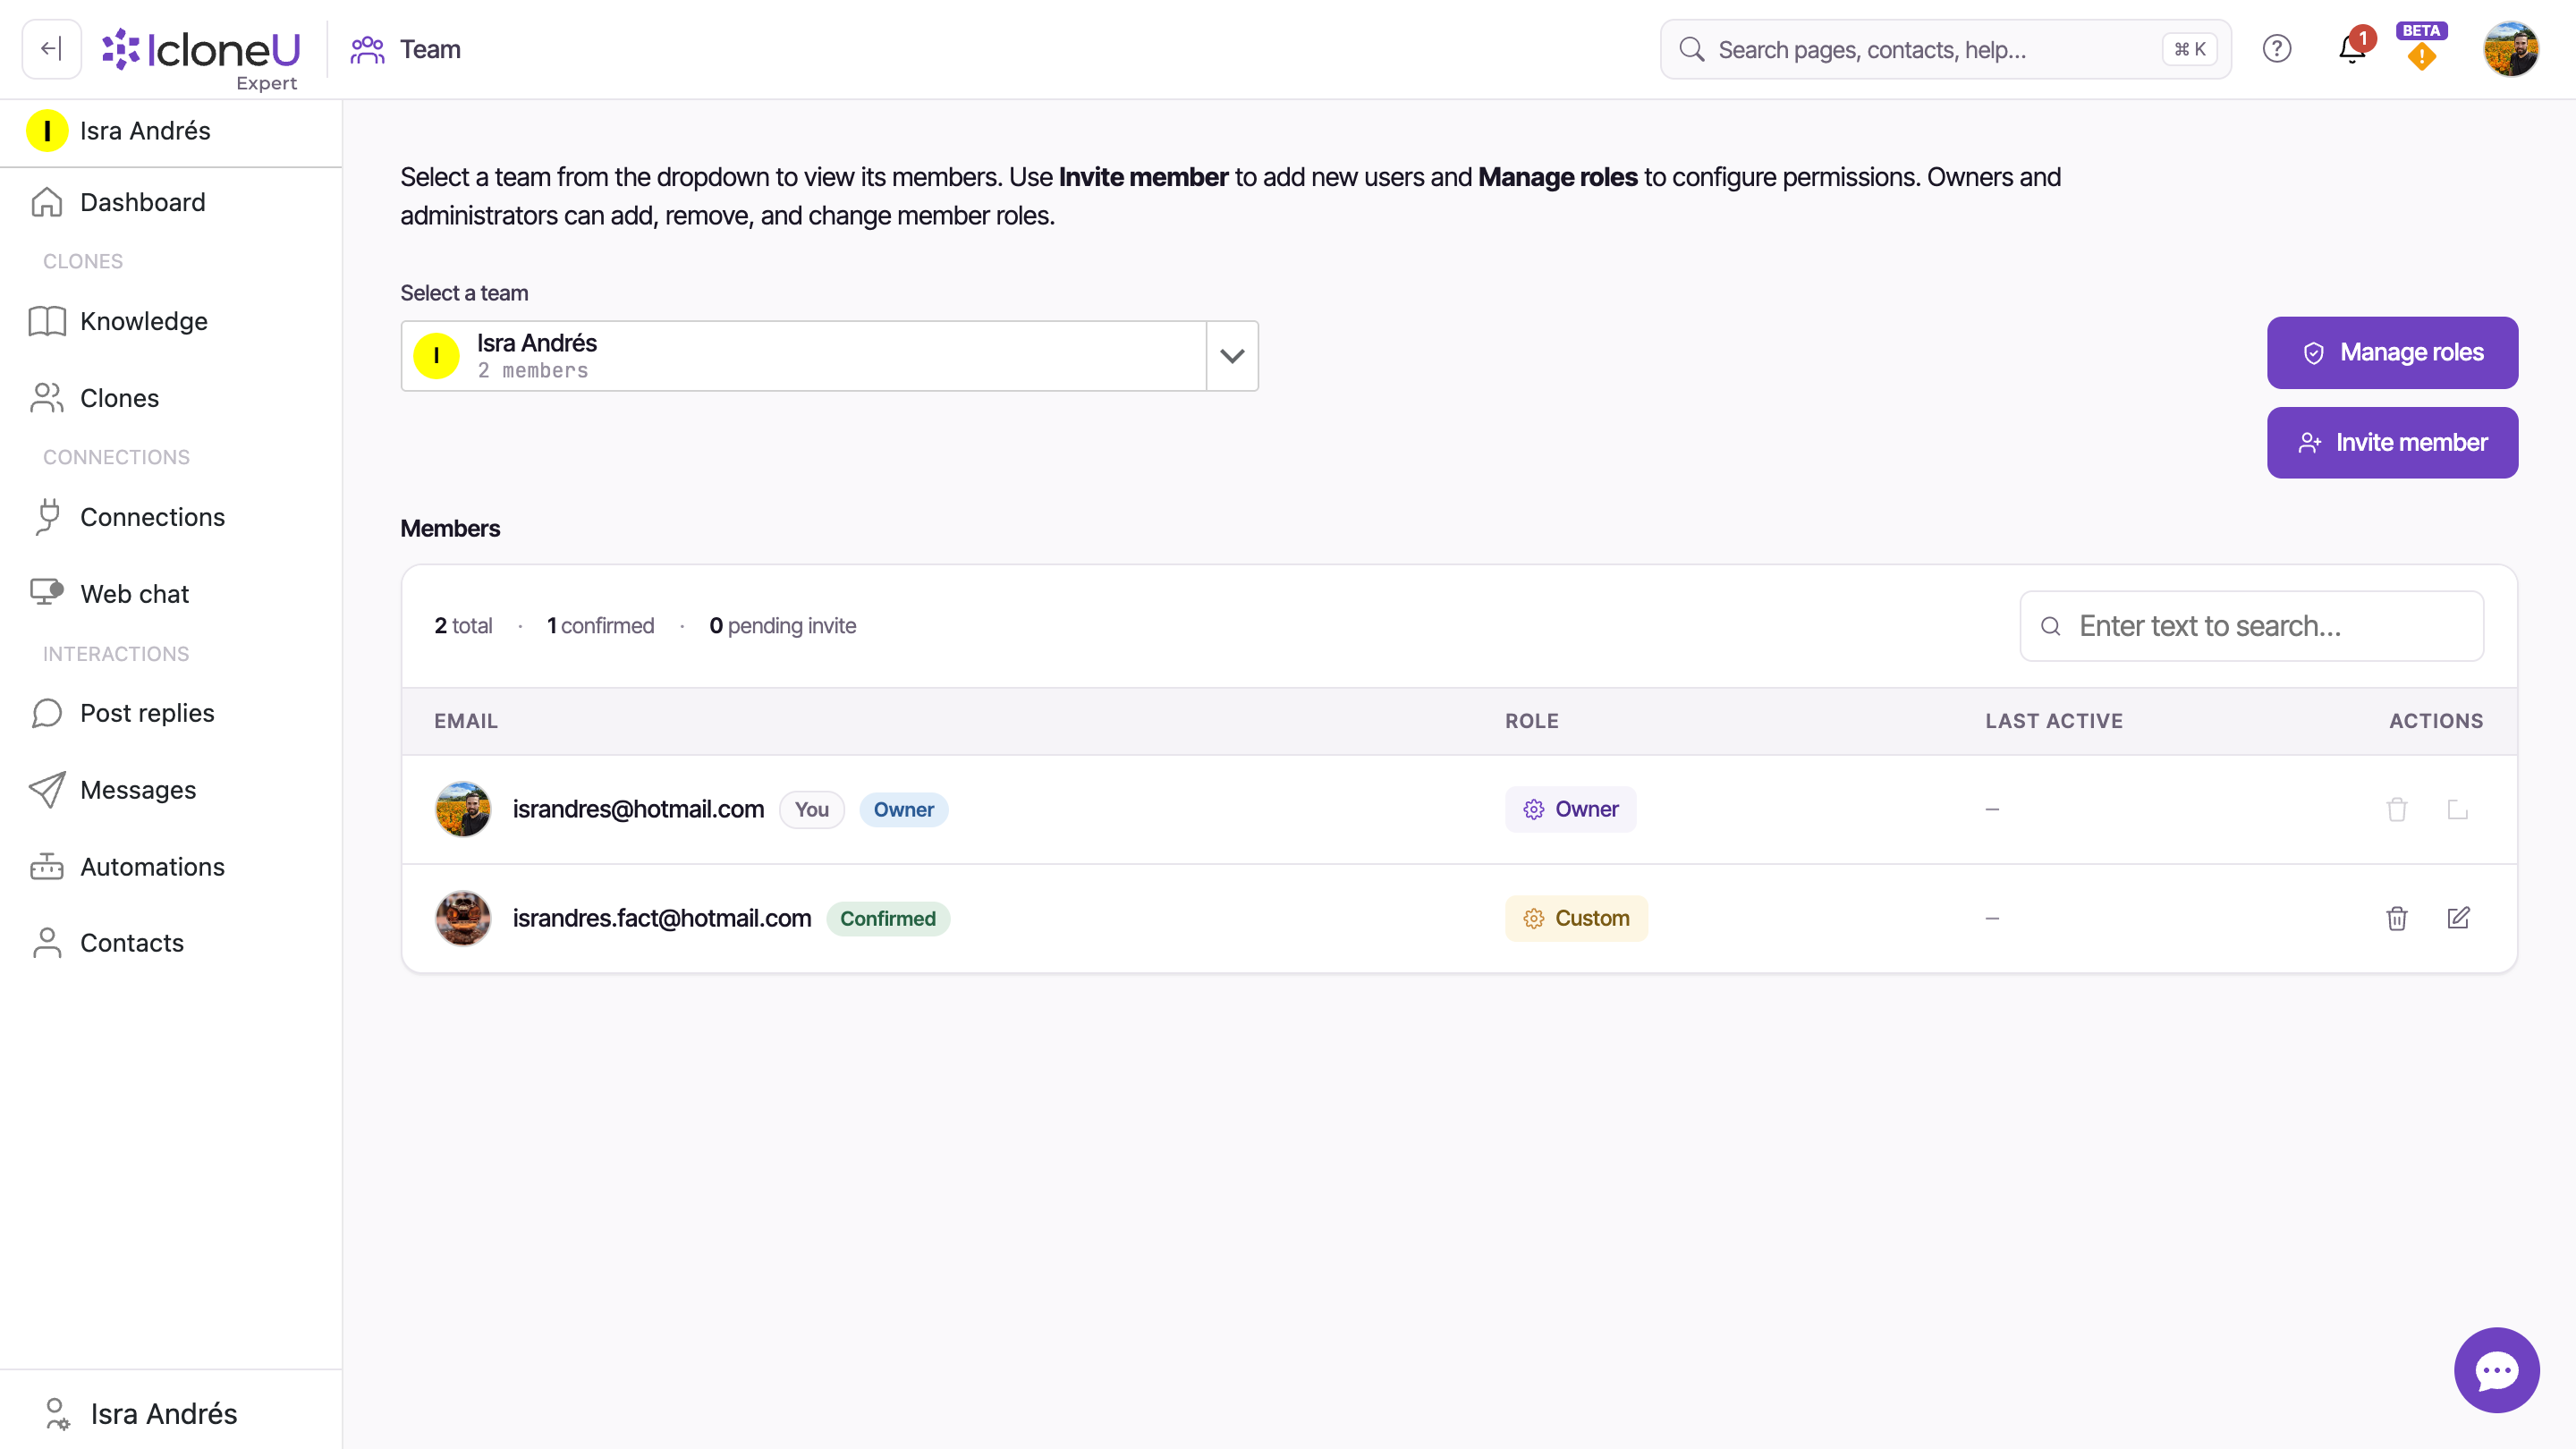
Select Team. The Team page opens with a team selector at the top, a Members grid, and the Invite member and Manage roles buttons.
The page's own intro states the model: "Select a team from the dropdown to view its members. Use Invite member to add new users and Manage roles to configure permissions." The Members grid lists everyone with columns for email, role and last active; the account creator's row carries an Owner badge, and your own row is tagged You.
Invite a member
The whole invite happens in one dialog. Three fields, then send — or copy a link to deliver yourself.
Click Invite member
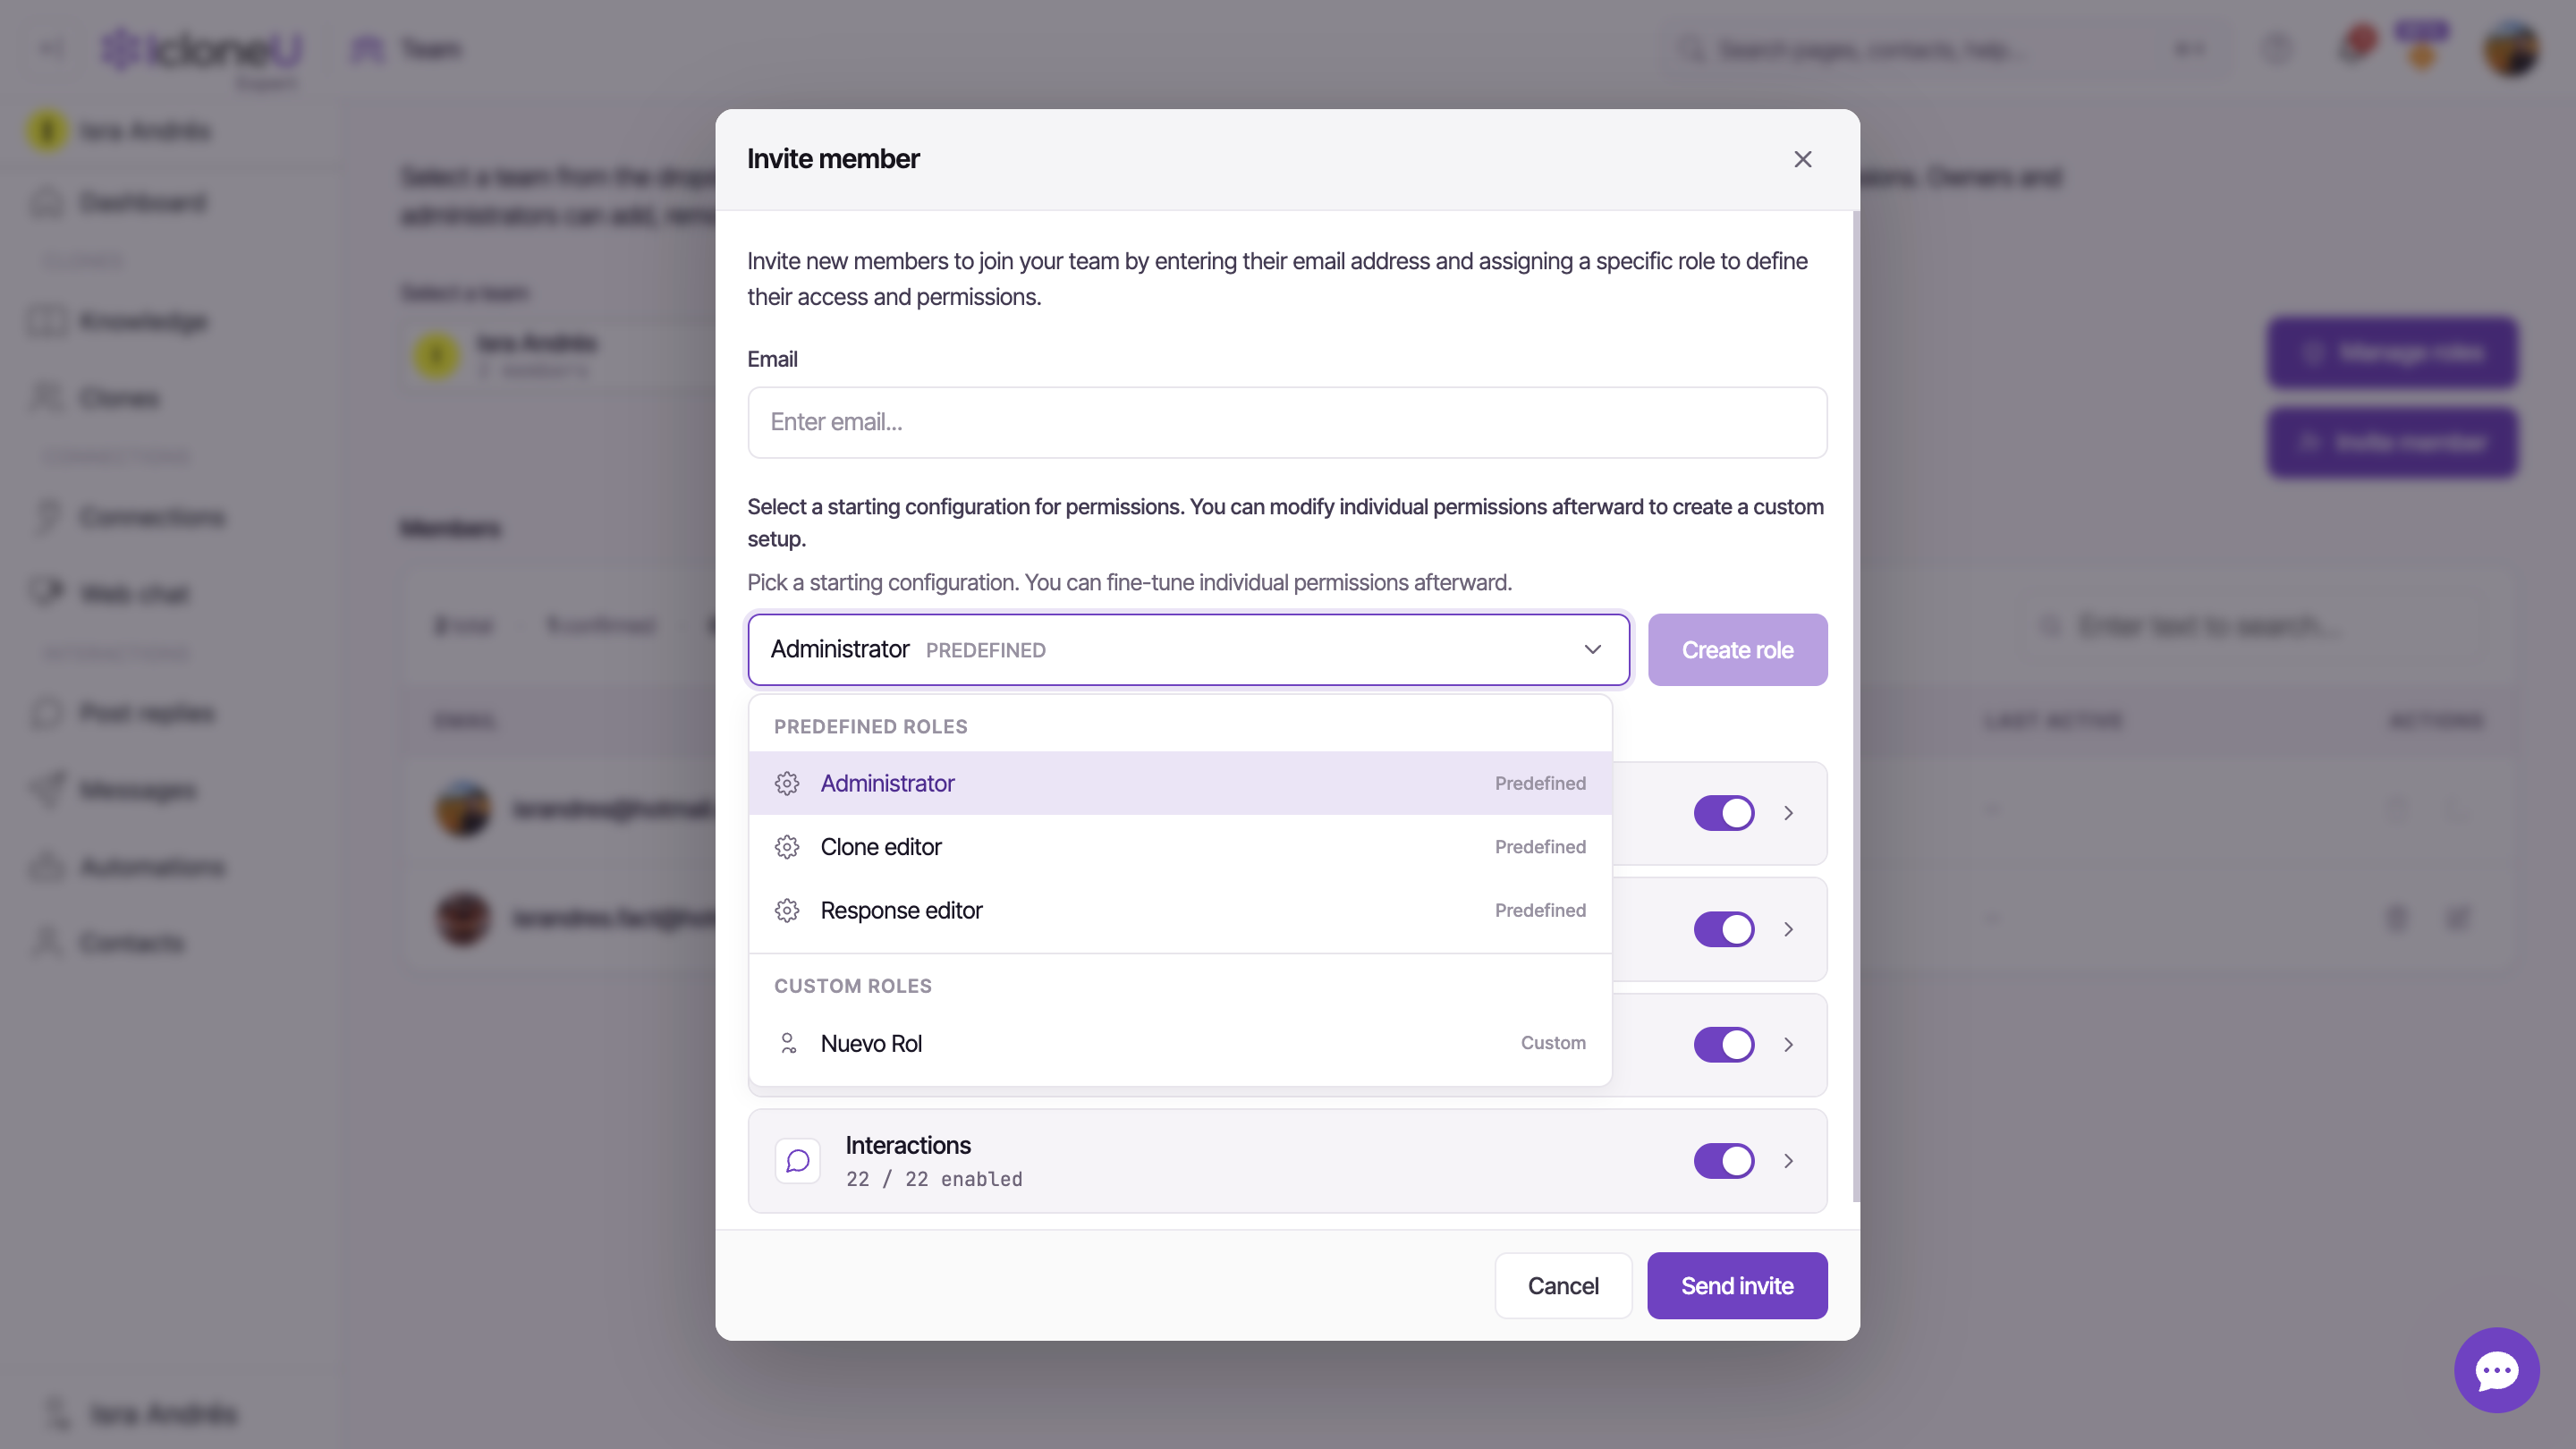
On the Team page, click Invite member (top-right). The dialog opens with the intro "Invite new members to join your team by entering their email address and assigning a specific role to define their access and permissions."
Enter their email
Type the teammate's address in the Email field. This is where their invitation is sent, so double-check it.
Pick a role
Use the role dropdown to choose a starting configuration. It groups Predefined roles — Administrator, Clone editor and Response editor — above your Custom roles (you'll see "No custom roles yet." until you create one). Picking a predefined role is the quickest way to get a sensible permission set; the three roles at a glance below explain the trade-offs.
TipA predefined role is just a starting point. The dialog says it plainly: "You can modify individual permissions afterward to create a custom setup." The Permissions section below the dropdown shows four groups — Account, Clones, Connections and Interactions — that you can fine-tune, and a Create role button to save the result as a reusable custom role.
Send the invite — or copy a link
Click Send invite to email the invitation to the address you entered. If their mail server blocks the invitation email, click Copy invite link instead — it creates the same pending invite, but puts the invitation link on your clipboard (valid for 24 hours) for you to send to them directly, and no email goes out. (Or Cancel to back out — no invite is created until you click one of the two.)
The three predefined roles at a glance
IcloneU ships three ready-made roles you can assign straight from the dropdown. Each is a bundle of granular permissions across four groups — Account, Clones, Connections and Interactions — and the dialog shows how many permissions each group has enabled. Pick the one closest to what the person should do:
| Role | Best for | What it can do |
|---|---|---|
| Administrator | A second-in-command across the whole workspace | Broad access — every permission switch in all four groups, with account-level exceptions (see the note below) |
| Clone editor | Someone who builds and tunes the Clones | Full control over the Clones group, with limited account and connection access |
| Response editor | Someone who handles day-to-day messages and replies | Strong Interactions access, with light Clone, Connection and account access |
The dropdown offers exactly these three predefined roles. Owner isn't one of them — it's the badge the account creator carries on the Members grid, not a role you can invite someone into. If you need a read-only or narrower setup, start from the closest preset and switch off the permissions you don't want, then Create role to save it.
An Administrator has every switch on, Manage plan and billing included: inside your team they can use Manage seats and buy units for the team from the Dashboard, and what they buy is charged to the team's account, not their own. An Administrator cannot change the team's plan, delete the team's account, transfer ownership, or remove or edit the Owner's row: changing plan and deleting an account always act on the signed-in person's own account. An Administrator can invite members — including other Administrators — and delete Clones and Connections.
Not sure which to pick, or want to see exactly which permissions sit inside each group? The companion guide Managing team members and roles breaks down the permission groups and how to build custom roles.
After you send the invite
Once you click Send invite — or Copy invite link — the invitation goes to the email address you entered (or lands on your clipboard for you to deliver), and the new person is expected to appear in the Members grid with a pending invite status. The grid's summary row tracks invitations separately from confirmed members — it counts N total · N confirmed · N pending invite — so a sent-but-not-yet-accepted invite is reflected in that pending count.
Here's how the invitation behaves from that moment on:
- The link lasts 24 hours; the invitation doesn't expire. The emailed link stops working after 24 hours, but the row stays as pending invite indefinitely until it's accepted or cancelled. If the link lapsed, open the member's row and use Resend in the Edit member dialog — it emails a fresh link, valid for another 24 hours, that replaces the old one. If their mail server blocks the invitation email, use Copy invite link in that same dialog instead — it puts a fresh link, also valid for 24 hours, on your clipboard for you to send to them directly.
- The address already has an IcloneU account? That account is reused: accepting the invite simply confirms membership, with no new password asked. If the address is already a member of this team, the invite is rejected up front; and someone opening the link while signed in as a different user is asked to sign out first.
- The person isn't registered? Their account is created at invite time, without a password — accepting the link is where they set one. Tell them not to register separately with that email in the meantime: the sign-up form will refuse the address as already taken. The invitation link is their way in. One difference if they joined through a link you copied rather than the invitation email: their email address is not automatically verified when they accept. They can sign in and work normally, and can verify the address later from their account page — but until they do, password recovery by email won't reach them.
- You can change the role before it's accepted. Pending rows are editable, and the person joins with the permissions as they stand at acceptance — not the ones from the original invite.
- A pending invite doesn't occupy a billed seat. The seat is occupied — and billed — only on acceptance. Creating the invite — whether you send it or copy the link — is still checked against your plan: at or over your included users, a trial account can't create the invite (upgrade first), while a paid plan can, with a notice that a billed seat will be added when it's accepted.
- A seat doesn't come with its own plan or trial. For someone whose IcloneU account starts with your invitation, what they can do follows your team's plan, and IcloneU sets up no separate billing for them — no subscription of their own, and no free trial. They can buy a personal plan whenever they like, but it goes through ordinary paid checkout; the free trial is for people who sign up on their own. That still holds after you remove them from the team, so a former teammate buys rather than starting a fresh trial. Anyone who already had an IcloneU account of their own before joining keeps whatever billing it had.
- Cancelling — the delete action on the pending row revokes the invitation; see Managing team members and roles. The confirmation dialog reuses the generic remove-member wording.
Frequently asked
Three predefined roles: Administrator, Clone editor and Response editor — plus any custom roles you've created. There is no "Viewer" preset, and you can't invite someone as Owner (that's the account creator's badge, not an assignable role).
Yes. A predefined role is just a starting configuration — the dialog notes you can "modify individual permissions afterward to create a custom setup." Use the four permission groups under the dropdown to fine-tune, and the Create role button to save the result as a reusable custom role.
No — that's the point of roles. Pick Response editor for someone who just handles messages, or Clone editor for someone who only works on the AI Clones. Only Administrator grants the full set. You can also tighten any preset before sending.
The team's Owner, and anyone whose role includes Manage team members and roles — every administrator has it. As the Team page puts it: "Owners and administrators can add, remove, and change member roles." If you don't see the Invite member button, your role doesn't include that permission.
From the Members grid on the Team page — that's covered in Managing team members and roles, along with building custom roles and the full permission breakdown.
Last updated September 22, 2026 · Getting Started