An IcloneU account can be run by more than one person, and the Team page is where you decide who gets in and what they can touch. Access is role-based: three predefined roles IcloneU maintains for you, plus custom roles you build yourself. This guide is the deep reference — what each role actually grants, how the permission groups break down, and the change-role and remove flows. If you just want to add your first teammate, start with the quickstart: Inviting team members.
Open the avatar menu in the top-right corner and choose Team — the entry is there on every plan. Adding, removing and changing members takes the Manage team members and roles permission, which the Owner and every Administrator have; the page itself says owners and administrators can do it.
The Team page at a glance
The page states its own model up front: "Select a team from the dropdown to view its members. Use Invite member to add new users and Manage roles to configure permissions. Owners and administrators can add, remove, and change member roles." Three elements do the work:
- The team selector — a Select a team dropdown naming the team (labelled with the account email) and its member count. It's a selector, which implies you can belong to more than one team and switch between them.
- The Members grid — a summary row (N total · N confirmed · N pending invite), a search box, and the columns Email / Role / Last active / Actions. Your own row is tagged You; the account creator's row carries the Owner badge. Each row has per-member action icons.
- Roles — opened with the Manage roles button, where custom roles are created and the predefined ones are explained.
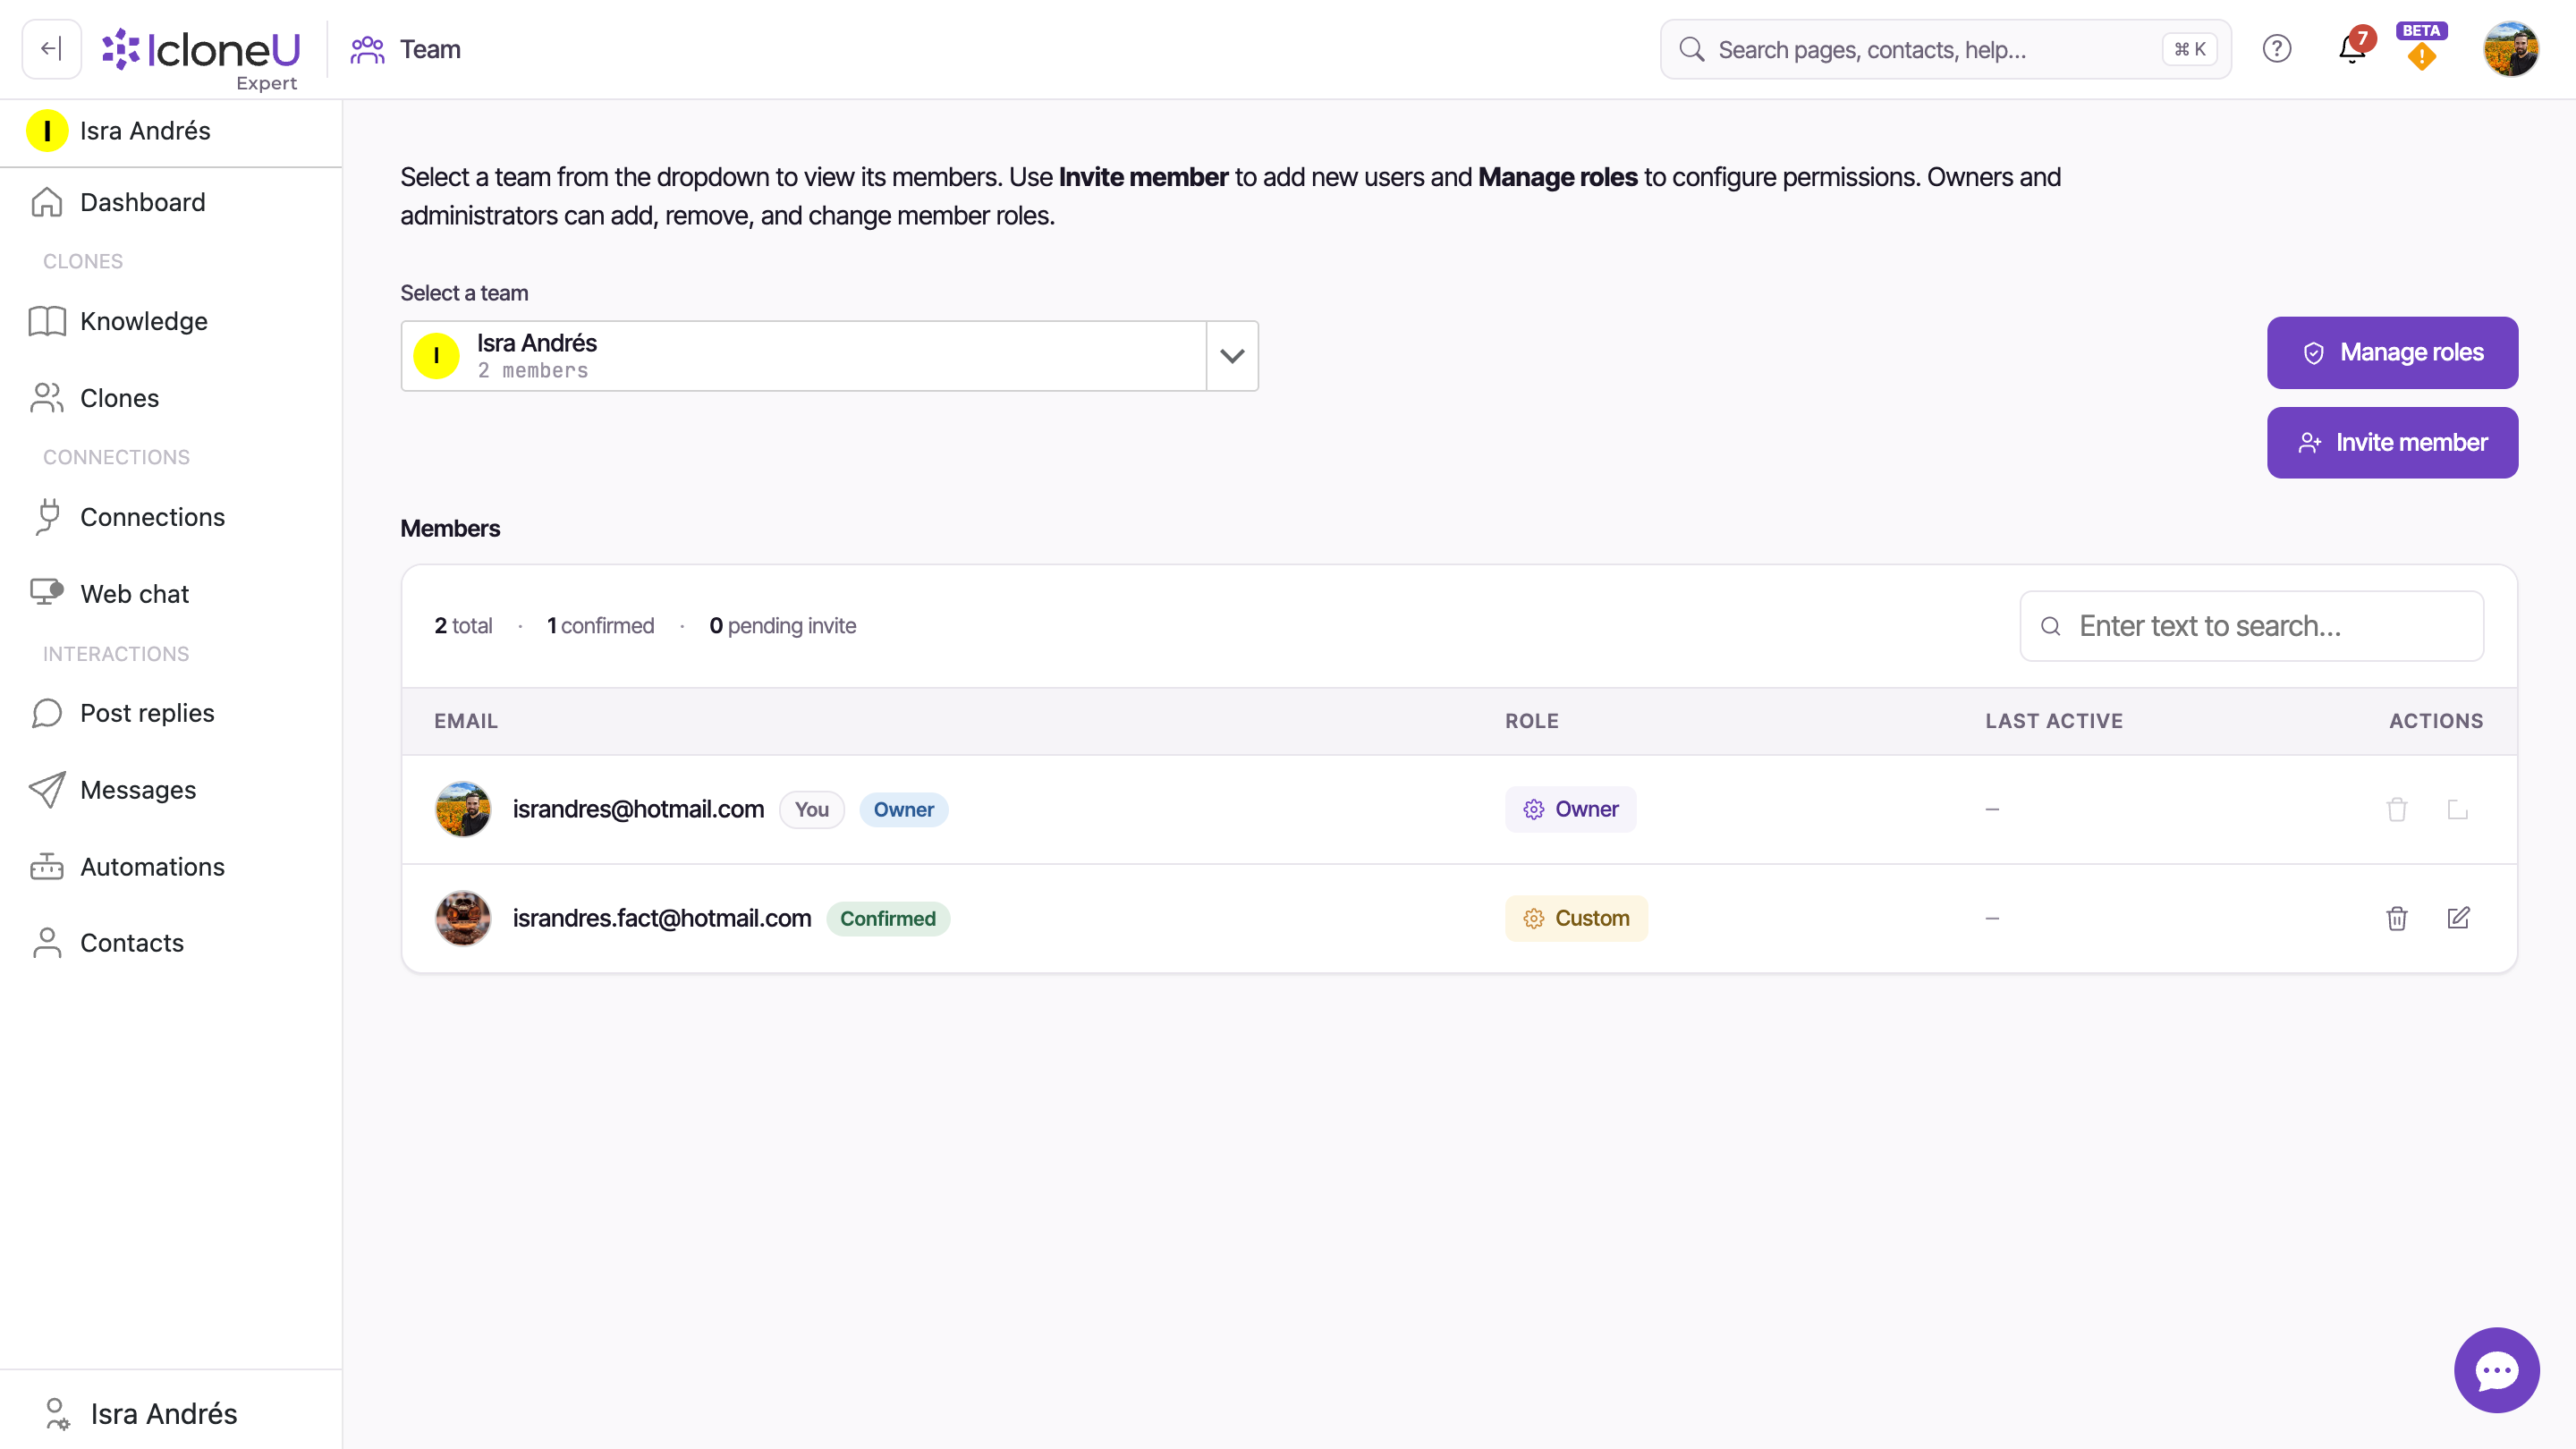
The summary row tracks three member states. A teammate you've invited but who hasn't accepted yet counts under pending invite; once they accept they move to confirmed. That count is the in-product signal of where an invite stands.
The three predefined roles
Every role is a bundle of granular permissions spread across four groups — Account, Clones, Connections and Interactions. IcloneU ships three predefined presets; the table shows how many of each group's switches they turn on, as the dialog counts them — Account has 8 switches, Clones 4, Connections 4 and Interactions 14.
| Role | Account | Clones | Connections | Interactions | Best for |
|---|---|---|---|---|---|
| Administrator | All | All | All | All | Broad access — every permission switch on, though not account ownership (see the note below) |
| Clone editor | 4 of 8 (view only) | All | 2 of 4 (view only) | 6 of 14 (view only) | Someone who builds and tunes Clones and their Knowledge, with light access elsewhere |
| Response editor | 4 of 8 (view only) | 2 of 4 (view only) | 2 of 4 (view only) | 8 of 14 | Someone focused on conversations — reviewing, editing and handling replies |
Read the table as defaults, not handcuffs: a preset is a starting configuration. The dialog is explicit about it — "You can modify individual permissions afterward to create a custom setup." So Clone editor switching on all of Clones means it turns on every Clone permission by default; you're free to dial any of them back before you send the invite. Switches come in pairs: turning a Manage switch on also turns on its View switch, and turning View off also turns off its Manage. You can't turn on a permission you don't have yourself.
Each group lists sections of IcloneU, and every section has a View switch and, except Dashboard and Team activity report, a Manage switch — 30 switches in all. Account: Dashboard, Team, Team activity report, Account settings, Plan and billing. Clones: Knowledge, Clones. Connections: Connections, Web chat. Interactions: Responses, Conversations, Contacts, Broadcasts, Reviews, Automations, Developer tools. In the dialog each switch carries its full name, such as View knowledge or Manage conversations and respond as agent.
For the pages in the sidebar, View shows the page and lets the member open it — without it, the page reads "You don't have access to this section" — and Manage adds the buttons that create, edit, delete and run things there; with View alone the page is read-only. Broadcasts and Developer tools are tabs inside Contacts and Automations, so the sidebar entry that leads to them follows View contacts and View automations. In the Account group, View team shows the members list on the Team page, which stays open to everyone so they can switch teams; Manage team members and roles covers inviting, editing and removing members and managing roles; View team activity report adds the Activity view; and Manage plan and billing lets a member change the team's seats (together with Manage team members and roles) and buy units for the team from the Dashboard.
An Administrator has every switch on, Manage plan and billing included: inside your team they can use Manage seats and buy units for the team from the Dashboard, and what they buy is charged to the team's account, not their own. An Administrator cannot change the team's plan, delete the team's account, transfer ownership, or remove or edit the Owner's row: changing plan and deleting an account always act on the signed-in person's own account. An Administrator can invite members — including other Administrators — and delete Clones and Connections.
Owner is not a role you can assign
Owner is the account creator's badge — it appears on their row in the Members grid, and it carries full control. But it is not one of the invite presets: the role dropdown offers only the three predefined roles plus any custom roles you've made. You cannot invite someone as Owner.
Because the Owner row is fixed, it isn't something you remove or re-permission from the grid — you can't take the Owner off the team or rewrite their access there. To hand off the workspace itself, you'd be transferring ownership, which isn't something this guide can walk you through; contact support if you need it.
Building a custom role
When the three presets don't fit, make your own. There are two ways in, and both end up in the same place — a named role with exactly the permissions you choose.
Open Manage roles
On the Team page, click Manage roles. The Roles dialog lists your custom roles in a Role name / Members / Permissions grid. Until you've made one it shows the empty state: "No custom roles yet. Click \"New role\" to create one."
NoteThe dialog spells out the governance rule, verbatim: "Predefined roles are managed by IcloneU and cannot be renamed or deleted. You can still fork them into a custom role." That's the key idea — you can't edit Administrator, Clone editor or Response editor, but you can fork one as the starting point for your own.
Create the role
Click New role. A new custom role appears in the list, ready for you to rename and to expand its permission groups and toggle individual switches on or off.
Or fork a predefined role while inviting
The other route lives in the Invite member dialog: pick a predefined role as your starting point, adjust its permissions, then use the Create role button to save that combination as a reusable custom role. This is how you "fork" a preset — start from Administrator, trim what you don't want, and keep the result.
Custom roles belong to your account and show up alongside the predefined ones in the role dropdown, tagged Custom versus Predefined so you always know which is which.
Changing a role or removing a member
Both live in the Members grid's Actions column, and both need the Manage team members and roles permission, which the Owner and every Administrator have. The Owner row is the exception — its actions stay disabled.
Find the member
On the Team page, use the search box (it filters by email) to locate the person, or just scan the grid. Their current role shows in the Role column.
Change what they can do
Use the row's edit action in the Actions column to adjust their permissions — you can pick a different role as a starting point or fine-tune individual toggles, the same way you set access at invite time.
TipChanging access is non-destructive and reversible — you can re-open the same member any time and adjust again. New permissions apply to what that member can do going forward.
Remove someone
Use the row's remove action in the Actions column. If the row is still a pending invite, removing it revokes the outstanding invitation; if the member has accepted, it takes them off the team — you'll typically be asked to confirm first.
Removing a teammate only revokes that person's access to your workspace — it doesn't touch your Clones, Knowledge or conversation history. This is unrelated to a Connection's Remove, which disconnects a channel and deletes its settings — there, your conversation and post history is kept by default and reattaches if you reconnect the same account, and is only purged if you tick "Also permanently delete all conversation and post history for this account" in the confirmation dialog. Different surfaces, different consequences.
They lose access to your team's workspace and, with it, the plan that access ran on. If their IcloneU account began as your invitation, it has no billing of its own to fall back to, so they are pointed at the Plans page to buy their own. They aren't offered a free trial at that point: the trial is for people who sign up on their own, and someone who has already been working in IcloneU on your plan buys directly instead. A teammate who already had an IcloneU account of their own before joining keeps whatever billing it had.
Frequently asked
Inviting team members is the quickstart — the few clicks to add your first colleague and pick a role. This guide is the reference behind it: what each role actually grants, how to build custom roles, and how to change or remove people later. Read the quickstart to get moving; come here when you need the detail.
No — the dialog states it plainly: "Predefined roles are managed by IcloneU and cannot be renamed or deleted." What you can do is fork one into a custom role: start from Administrator, Clone editor or Response editor, adjust the permissions, and save the result as your own role with Create role.
Owner is the account creator's badge, not an invite preset. The role dropdown offers the three predefined roles plus any custom roles you've created — there's no "Owner" option, and the Owner's own row can't be removed or edited from the grid.
Access changes are non-destructive and apply to what that member can do from then on. You can re-open the same member and adjust again at any time; nothing about the change is permanent or one-way.
No. Removing someone revokes their access to your workspace; it doesn't delete Clones, Knowledge or conversations. Don't confuse it with a Connection's Remove, which disconnects that channel and drops its settings — its conversation history is kept unless you opt in to deleting it.
Last updated September 22, 2026 · Account & Settings